

Merging Documents in Primafact
The Merge feature is used to bring multiple documents together into a single document in Primafact. This is an essential feature of Primafact – largely because documents too large to be scanned at one time will need to be combined after scanning.
When merging two or more documents together, you’ll need to pay attention to which of the merged documents is your “lead document.” The pages in the lead document will appear first in the merged page sequence, and only the location, title and profile information associated with the lead document are preserved in the merge. (Because the other document(s) are becoming part of the lead document, it will govern where the combined document is situated and document-level information.)
How to Merge Documents
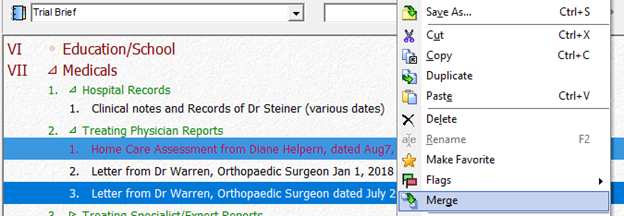
Always merge your documents in the Binder view, or Intake Window (Document Queue) . To Merge a document(s), click CTRL while clicking your “lead document”, keeping the CTRL key depressed while selecting the document to be merged with your lead document. Right Click, and select MERGE:
Following your Merge your lead document will remain in place, with the added pages appearing at the end of the document.
Extracting Documents in Primafact
Extracting in Primafact allows single document to be broken down into multiple documents. There are two ways to extract pages from a document:
- Move – “cuts” selected pages from your document and pastes into a brand-new document (your original document will lose those pages).
- Copy – clones the selected pages and uses them to create a new document. Your original document stays intact.
Why Use the Extract Feature
A good example of using the Copy feature is when you need to independently save a particular report contained within a larger document, such as an X-Ray from Clinical Notes and Records, indexed as a separate production. This way the original Clinical Notes (inclusive of the X-Ray) remains intact in your Medical Brief, while you have a freestanding X-Ray indexed in your production brief.
A good example of using the Move feature is when you need to separate a single large document into individual productions to be managed independently – such as taking a large Insurance file and breaking it down into individual forms, reports and correspondence.
Keeping track of Merged and Extracted Documents
Consider maintaining source information in a dedicated Profile field for future reference (such as the origin of an extracted document), in case you ever need to go back to determine document history.
How to Extract Documents
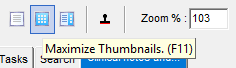
When extracting multiple pages, we recommend switching to the Thumbnail View (click the Thumbnail button on the tool bar)
.
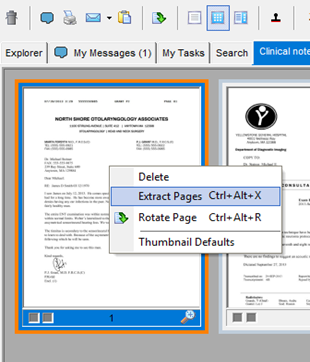
Click CTRL while selecting the pages for extraction. (PRO TIP: To reorder pages in the extracted document, click pages in the order that you wish them to appear in your new document.)
Right Click and select Extract Pages:
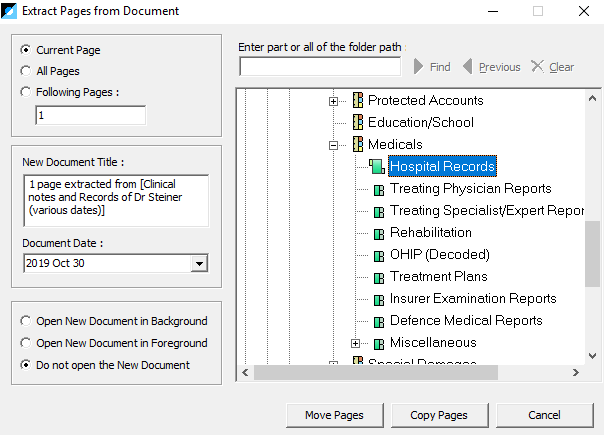
Adjust the Document Title as needed (this can be done later), select the destination location for the extracted document.
Most importantly, select Move Pages or Copy Pages. (Be careful to Copy if you wish to keep your original document intact.)
The extracted pages will appear in the selected binder. If you did not create a New Document Title at the time of the extraction, the extracted document title will indicate whether it is a copy or it has been extracted (moved) from the original document.

For more tips on effectively using Primafact's Case development features, visit our Training video library
|

For more information about Primafact's Document Management Software for Litigators, please contact Sales at 1-877-726-3228 (Canada Toll Free), 1-877-873-0592 (USA Toll Free)


