Primafact supports documents management by “Case”, which is visually identified as a black folder icon. Supported with standardized but customizable binders/folders a Case includes coding and review features that make it easy to manage documents and associated markup for efficient ream review as Cases progress.
The Case Navigation Ribbon is only available on folders set up as Cases (identified as Black Folders in Primafact) – if your matters are set up in a regular yellow folder, you will not be able to access Case features, including the Case Navigation Ribbon. To access the Case Navigation Ribbon, click on any Case Binder. You will see the blue Case Navigation Ribbon at the bottom of the binder view. This ribbon is also visible using the Summary, Documents and Annotations screens. The Case Navigation Ribbon is not available when viewing Case Content in a folder list view.
Binder View
The Binder is a unit for grouping documents in Primafact Cases. The Binder View allows documents to be positioned in a discretionary order, as determined by members of the team.
Clicking on a Binder displays the “Binder View” for that Binder. The Binder View also includes the blue binder navigation ribbon at the bottom of the screen, which allows users to access other Views, including the Case Summary screen, Annotation List, and Documents Views. These views can only be accessed from within the Binder View. The order of documents displayed in the Binder View is common to all users – this means that if a document is moved by one user, it is seen in that same binder location by all users. However, the Binder can be customized (numbering preferences, icon display preferences) at the user level, with selections not impacting other users.
The order of documents displayed in the Binder View is common to all users – this means that if a document is moved by one user, it is seen in that same binder location by all users. However, the Binder can be customized (numbering preferences, icon display preferences) at the user level, with selections not impacting other users.
Binder Tabs and Sections
Binders are subdivided into Tabs and sections for more detailed document organization and easier navigation. The Tab is the highest level of binder organization, and each Tab can be divided into sections and subsections.
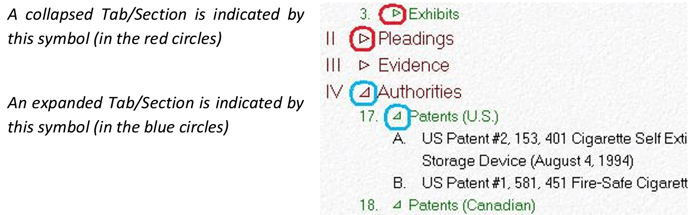
Binder Collapse/Expand
You can collapse binder tabs and sections to more easily navigate binders. Collapsing and Expanding Applies Only to You: Unlike binder sorting, which impacts all users, collapsing and expanding tabs and sections only affects your view of the binder.

Case Navigation Ribbon
This blue ribbon, found at the bottom of the Case Binder and Case List Views, provides access to key Case views, along with Binder Page Numbering and Case Customization options accessed via the Gear menu.
The Case Navigation Ribbon is only available on folders set up as Cases (identified as Black Folders in Primafact) – if your matters are set up in a regular yellow folder, you will not be able to access Case features, including the Case Navigation Ribbon. To access the Case Navigation Ribbon, click on any Case Binder. You will see the blue Case Navigation Ribbon at the bottom of the binder view. This ribbon is also visible using the Summary, Documents and Annotations screens. The Case Navigation Ribbon is not available when viewing Case Content in a folder list view.
Binder View
The Binder is a unit for grouping documents in Primafact Cases. The Binder View allows documents to be positioned in a discretionary order, as determined by members of the team.
Clicking on a Binder
The order of documents displayed in the Binder View is common to all users – this means that if a document is moved by one user, it is seen in that same binder location by all users. However, the Binder can be customized (numbering preferences, icon display preferences) at the user level, with selections not impacting other users.
Binder Tabs and Sections
Binders are subdivided into Tabs and sections for more detailed document organization and easier navigation. The Tab is the highest level of binder organization, and each Tab can be divided into sections and subsections.
Binder Collapse/Expand
You can collapse binder tabs and sections to more easily navigate binders. Collapsing and Expanding Applies Only to You: Unlike binder sorting, which impacts all users, collapsing and expanding tabs and sections only affects your view of the binder.
- Open a binder
- Click on the Collapse/Expand toolbar icon and select “Collapse All” or “Collapse” just the tab/section you have highlighted.

- Click on the Collapse/Expand toolbar icon and select “Expand All” or just the tab you have highlighted.
You can also expand and collapse by:
- Right-clicking anywhere in the binder and select Collapse All from the context menu.

- Left-clicking on the expand/collapse triangle beside a tab/section:
- Double-clicking on an collapsed tab/section heading will expand it.
- Double-clicking on an expanded tab/section heading will collapse it.